Wednesday 23 March 2011

My Wizard Light Up Table


I was checking through my blogs I follow and found Dales wonderful new fortune telling table complete with light up crystal ball, and it reminded me of my own Wizard light up table and I couldnt remember if Id shown it off before.
This table used to be in my haunted house but as this now has a different story behind it, this is residing in my new Wizard tower in the top floor.
It has got dragon heads as the base, with a wonderful stone in the centre. The table top is glass, and has a cut out for the LED lights to shine through. The small LED box is a 3 colour one, shines red, blue and green which is quite wonderful at night! It works off a simple switch to turn it on and off, on a tiny battery to power it. The glass marble acts as the crystal ball on top and the colours bounce off it around the room!

I love the table, I think Ive had it for about 5 years or so now, its a favourite piece!

So hope you like it Dale and everyone else! You will see it again in situ in my wizard tower once its all redecorated

Thursday 17 March 2011

Alice Shop Pictures Galore!


Ok, so here it is!

Not everything is in yet, all the left side of the shop will totally change, the mirror is a temporary fixture and the shelves will probably go on the right side of the room as the dressing table and another unit are going on the left!

Its so strange as looking at the pics it all looks muddly and like a complete muddle as there are so many pieces and so many colours but in real life I am thrilled to bits with it! These are alll taken in daylight, Im hoping to fathom out how to take shots through the windows later with the shop front on so you can see how it looks in the dark.....if my camera allows me!

Here is the left side of the room


The right


Close ups of displays


The shelves
As you can see Ive had to put up some of Victoria's beautiful perfume bottles, i couldnt wait any longer, but they will eventually go on the dressing table. Look lovely here though!


The Table


The Sewing machine


The whole work area


Susans fabulous piece, Kats hat etc


Still will be fiddling, moving things about, nothings fastened down ! The pictures are also temporary, ive ordered more ornate frames than these oval frames but had to put something up, the area looked too bare!


I have to say thankyou to Lori who has given me a great idea for a name for the roombox and how to do the logo. Im pretty useless on the PC with any photoshopping etc but I may try tracing some lettering and a hat logo somehow onot the black space and painting with gold lettering .

Wednesday 16 March 2011

Interior Shop Frontage of Hatter Shop Finished


This morning work! Here is the interior stripped


And now fully painted up, papered, peel off on and spray glossed to seal....all finished!


Just have to decide on a name and how to do the shop sign and Id really like to have a Top Hat on the front somehow, but Im no artiste so not sure how to go about that one!


This will go on its original bracket and save the dust getting in!

Ive bought 2 lovely wall display shelves, thanks to Michelle letting me know about them on Ebay thankyou Michelle! They are perfect for putting up with hats or perfume bottles.


Im still scouting for the perfect dressing table but hoping that will be soon, but I will post pics of the interior and what I have in there so far really soon, when the picture frames come Ive ordered and are up!

Monday 14 March 2011

By Royal Decree, New Hats and Dress or Off with my Head!!!


Ok so the Queen has been making demands that her hats and dress must be shown off to you all so here they are.


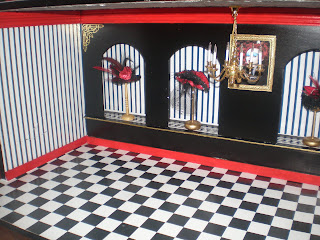
The red mouldings are in, albeit abit wonky but to be fair these wernt cut by me, it was a second hand roombox so I just took them off and painted them, they dont but up perfectly, but hey, just dont click on the close ups, you wont notice!


Here are some more close ups of Kats hats in the lit arches. Im putting some little perfume bottles and other accessories in here too.


Now advice please? Do you think the black display panel needs more detailing, maybe more gold on it, in the form of more peel off stripes or fancy bits like Ive put on the corners? What do you think? Or maybe 2 more smaller pictures hanging on the wall?


Last year Janice put some beautiful dresses on her blog by a very talented lady called 
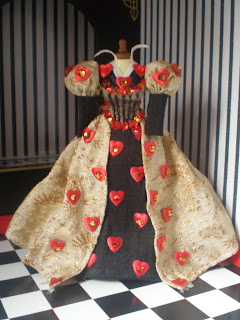
Cher. ( Click on her name to go to her ebay shop) I contacted her directly to ask if she fancied making me a Red Queen dress on a mannequin.
Cher was excited to help out and I was totally delighted with this stunning dress, as Id only sent an idea from pictures of what Id like it to be like, the rest was all Cher's imagination and design!


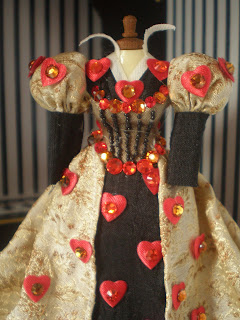
I love it, it fits in a treat in the roombox and Cher has kindly agreed to making me other things for the roombox in the future , maybe a red wig, or another corset ? There are so many things I want to fit in, I keep teasing Emily and saying Im going to steal her castle kit shes bought and use it for a whole red Queen castle so I can fit in all my ideas!!! Somehow I dont think she will let me !

And lastly here is another Of Tara's fantastic creations, an 'Eat Me' cake complete with its glass display box. Adorable and so detailed and beautifully made! This is going at the foot of the sofa, but Tara's pics are better than mine so here it is!


I have moved the roombox to its new home, though even John says it may have to come into the lounge to be shown off if i get dolls!!!

Its had all the furniture I have so far put in, but I still have pictures and other fancy bits to put up, and maybe some more hats need to be made!

Tomorrow Im off to Hobbycraft to look for some hearts and gems and see what peel offs they have that may go over the archways?
On my return Ill be busy decorating the interior of the shop front, maybe putting some things on the interior ledges .

Once its nearly there Ill do a big reveal, still not quite there yet!! But hey this is a major accomplishment for me, as I am known as 'Mrs I dont ever finish anything'!!

Sunday 13 March 2011

Lots more done today and some teaser Pictures!


I've done lots today!

Firstly this morning I decided to upholster the sofa.


This is the original in a cream satin which I stripped and used the old material as the template to use this gorgeous deep red velvet, courtesy of the wonderful Kat! Kat sent me some material for my eldest daughter Emily as Emily is currently doing lots of sketchbook work for her Fashion design BA and needs lots of fabric samples which she is having real problems finding. Id like to thanks both dear Kat and also the wonderful Nicky Cooper who were both very kind this week and sent Emily loads of samples and strips of fabrics that she can use, and I havnt seen her all day as shes been so busy using them all, thankyou both of you!


But I had a quick peek first to see if there was anything I could use and sure enough there was the perfect red for the sofa! So I stuck this all on, trimmed in a gold to match the chair I dressed some time ago, and detailed the furniture with the gold trusty pen!


Here are some pics of it, hope you like it. Kat's fab Hatters hat is already on it and looks perfect!


Next I made a small hat box and put some playing cards and hat pin stands on it.


Still eager to get on, I spent time sourcing some good pictures and printed them on gloss card and framed them.

Here is the red Queen in all her glory. This is the perfect space for the painting but once the chandelier is permanently stuck in you will only see it from the sides of course!


Ive also made up framed pics of the Bandersnatch and the Knave for other walls. I may detail these frames in black and red.


I couldnt resist taking some pics with some hats on stands in the archways. Most are Kats work, but can you also see my beautiful Hatter hat on the stand of books made by the lovely Sherry, Tara's mother in law. I have a few pieces of Sherrys work, and many of Tara's and I just love it all, they are such talented and creative, imaginative artistes! Sherry made a hat for Tara and I loved it so much she made one for me, and I think for another friend also! Im very proud to display it in the room box thankyou Sherry!!


So , what next? Well dopey here fell asleep last night and forgot to bid on the much wanted dressing table, ahhhhh!! But good news was, I contacted the seller who is getting more in, so end of the month fingers crossed that piece can be done and put in the room. In the mean time I have to take it all out, to move onto the landing and take some more pics for you. Then the table, sewing machine and hats can all go in, as well as another secret special piece Ive been saving to show you.

Just need my precious dolls now! If John says 'I told you so' one more time when he tells me I should have jumped in quicker when Julie was selling her Mad Hatter doll, Ill throttle him. He was, and is an incredible doll, and I think to have the Hatter hard at work at the sewing table plus another couple of special miniature pieces I long for in here, will just make this roombox truly perfect for me!

Saturday 12 March 2011

A new Display for Susans Fabulous Creation plus more!


When I received Susan's incredible ribbon spool display some months ago, I was undecided on the best way to display it to show it off at its best! I tried various tables but nothing looked right.

Looking through my boxes of furniture I found 2 little wooden displays I bought some time ago from someones bridal shop which were just unused. Once again too eager to get going, I forgot to take before pics but they were just plain wooden half circles with horrid carpeted tops! So I stripped them, painted over them in a red wash to give a redwood finish, then detailed them in gold and added the same black and white harlequin gloss paper thats in the archways, onto the front of them. Finished with some black peel offs for more detailing its a great unusual addition to the room. Photo is bad as I was dying to show it off but its dark in the conservatory so Ill retake tomorrow, check in for a better pic!

I added the spool display, a tea cup and tiny heart cupcake also made by Dear Susan, and voila, the perfect display for it!

I had 2 of these units so painted the other one to match and have added a little head and one of Kats beautiful hats to it, and will make something else to go on it too.


I did have a lovely dressing table all ready and painted up but once it went in the roombox, it was strange, but it looked completly wrong, far too big and bulky. So I have my eye on one on ebay and hoping I get it so i can dress it with Victorias gorgeous bottles she made for me.

Another find in my boxes was this haberdashery display. Once again I repainted it, added some reams of material ( I still have more to add on the other side) and put some of my homemade ribbon and lace samples, cotton reels, an iron, and some perfume bottles onto it, to give it the 'Alice' look! There is also a fantastic little tiny Alice 'Drink Me' potion bottle and the cutest darling little sleeping rose plant made for me by the oh so talented Tara.


The material display was a really battered and old piece of furniture so Im thrilled to find use for it!

Next week I have the ornate sofa I bought to reupholster, and if lucky with my dressing table, that to fill too.

I am leaving a couple of gaps for future purchases but have already put everything in I have so far to see what it looks like, and am thrilled with it! The red skirting and cornicing is in and you'll see that when I take another pic once I put the roombox in its new home on the landing table where it can be lit at night! Im really pleased with it so far, let me know what you think!

Oh and for those who have asked after her , heres a pic of beautiful Bella, alot bigger now already at nearly 5 months, but still a darling and cheeky pup!


Wednesday 9 March 2011

Phew what a Day, but we have lights !!


So all did not go to plan today but its all turned out ok thanks goodness!!

I papered last night, really shouldnt have as it was dark and shouldnt really work in false lighting as you see the faults come morning, but it was ok when I got up, no mistakes!


I decided to add some little strips of the black and white check paper to the ledges on the display panel to give some contrast to the black paintwork.


All went well, I decided to spray a gloss sealer on all the paintwork as it was chipping!

Then I marked the original holes for the lighting and added the new lights. Id bought 4 spotlights in the end, took off the plugs and fed the wires through the holes and then as it was too too tricky to nail the lights as they should be, I attempted superglueing, which was a challenge as the base was metal , glueing onto gloss wallpaper wasnt easy! But it eventually held fast and they are great as they pivot so you can position directly onto the hat areas!

Forgot to take a pic of the lights done , der! , all too eager to get that display panel back in to see if it worked!! Here are the stlye of lights used.


First I put in the chandelier which surprisingly I found straight away, first box I went to this morning! I fed this through one of the arches and then began the tricky part!

Getting the display panel out was nightmare. Getting it in, OMG!!! REAL BIG nightmare!


I wiggled as gently as I could but as Ive put added layers of wallpaper, paint etc it just didnt want to go. I had to give a big shove and in it went...........but it took a big chunk out of the left hand side of my wallpaper :-) Also some of the ceiling paper has scuffed but this Ill just stick down and paint some white acrylic over! It could have been alot worse, if it had taken the floor out it would have been a big disaster, but I just stuck it down and the dressing table is going there anyway so it will be hidden


. ( Truth be told I was all for stripping it and starting again as Im too much of a perfectionist but John told me not to as it wouldnt be seen.....but as I said to him Ill know its there lol!)


Then the moment of truth, I plugged in the lights and they all worked and look fab, directing the spots infront of the archway displays for hats, and the main pretty chandelier lights up the room a treat!


I took these pics and dont know how to take them to really show them up in the dark, my camera automatically adjusts so you cant see the lighting well! Also I had only just sprayed up the skirting and cornice parts so they arnt fitted yet, as still have to let them dry and then gloss them too. They will fit in on the left and right side walls top and bottom to match the mouldings on the display panel! But the pictures give you an idea of the look of the box!


So tomorrow Ill fit the mouldings and start to add what I have so far for the room. I still have lots of furniture to upholster and things to make but Ill show all the pics as I do it!